CrayfishXu

专注Android,填坑铺路

0%

Activity启动流程(一)

前言

我觉得是时候开始深入源码进行学习了,开刀一个当然是我们最常用的Activity。平常startActivity也是最常用的跳转,但是重来没有了解过其内部逻辑,今天就来揭开它的面目。参照源码是Android7.1.1。其实类似的文章已经遍地都是了,我在这里也是为了记录一下我的学习过程。

Activity跳转

首先我们在跳转Activity的时候都会使用startActivity(Intent intent),那么我们Ctrl+左键进入看源码。

1
2
3
4
5
6
7
8
9
10
11
12
13
14
@Override
public void startActivity(Intent intent) {
this.startActivity(intent, null);
}
@Override
public void startActivity(Intent intent, @Nullable Bundle options) {
if (options != null) {
startActivityForResult(intent, -1, options);
} else {
// Note we want to go through this call for compatibility with
// applications that may have overridden the method.
startActivityForResult(intent, -1);
}
}
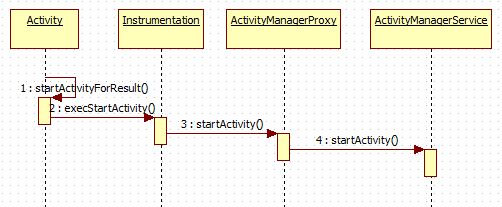
原来都调用了startActivityForResult(),如果我们需要Activity返回数据,触发onActivityResult回调的时候就是用的这个,这里写死了-1就是不回调。然后接着往下看。

1
2
3
4
5
6
7
8
9
10
11
12
13
14
15
16
17
18
19
20
21
22
23
24
25
26
27
28
29
30
31
32
33
34
35
36
37
38
public void startActivityForResult(@RequiresPermission Intent intent, int requestCode,
@Nullable Bundle options) {
if (mParent == null) {
//数据进行转换 新加入的
options = transferSpringboardActivityOptions(options);
//启动新的Activity,核心在mMainThread.getApplicationThread()中完成
Instrumentation.ActivityResult ar =
mInstrumentation.execStartActivity(
this, mMainThread.getApplicationThread(), mToken, this,
intent, requestCode, options);
if (ar != null) {
mMainThread.sendActivityResult(
mToken, mEmbeddedID, requestCode, ar.getResultCode(),
ar.getResultData());
}
if (requestCode >= 0) {
// If this start is requesting a result, we can avoid making
// the activity visible until the result is received. Setting
// this code during onCreate(Bundle savedInstanceState) or onResume() will keep the
// activity hidden during this time, to avoid flickering.
// This can only be done when a result is requested because
// that guarantees we will get information back when the
// activity is finished, no matter what happens to it.
mStartedActivity = true;
}
//取消输入和开始退出变化 新加入的
cancelInputsAndStartExitTransition(options);
// TODO Consider clearing/flushing other event sources and events for child windows.
} else {
if (options != null) {
mParent.startActivityFromChild(this, intent, requestCode, options);
} else {
// Note we want to go through this method for compatibility with
// existing applications that may have overridden it.
mParent.startActivityFromChild(this, intent, requestCode);
}
}
}

这里出现了mParent的判断,那么我们就找到这个值的说明,如下

1
2
3
4
5
6
7
8
9
/** Is this activity embedded inside of another activity? */
public final boolean isChild() {
return mParent != null;
}

/** Return the parent activity if this view is an embedded child. */
public final Activity getParent() {
return mParent;
}

英文不太好,找了百度翻译,大致就是内嵌的时候返回的mParent不为空。据说是用在ActivityGroup中,现在已弃用。那么我们还是先分析不为空的情况,因为最后逻辑是又走到一起去的。

1
2
3
4
5
6
7
8
9
10
11
12
13
14
public void startActivityFromChild(@NonNull Activity child, @RequiresPermission Intent intent,
int requestCode, @Nullable Bundle options) {
options = transferSpringboardActivityOptions(options);
Instrumentation.ActivityResult ar =
mInstrumentation.execStartActivity(
this, mMainThread.getApplicationThread(), mToken, child,
intent, requestCode, options);
if (ar != null) {
mMainThread.sendActivityResult(
mToken, child.mEmbeddedID, requestCode,
ar.getResultCode(), ar.getResultData());
}
cancelInputsAndStartExitTransition(options);
}

接下来就关注Instrumentation,它调用了execStartActivity方法。

1
2
3
4
5
6
7
8
9
10
11
12
13
14
15
16
17
18
19
20
21
22
23
24
25
26
27
28
29
30
31
32
33
34
35
36
37
38
39
40
public ActivityResult execStartActivity(
Context who, IBinder contextThread, IBinder token, Activity target,
Intent intent, int requestCode, Bundle options) {
//核心功能在whoThread中完成,器内部scheduleLaunchActivity方法用于完成activity的打开
IApplicationThread whoThread = (IApplicationThread) contextThread;
Uri referrer = target != null ? target.onProvideReferrer() : null;
if (referrer != null) {
intent.putExtra(Intent.EXTRA_REFERRER, referrer);
}
if (mActivityMonitors != null) {
synchronized (mSync) {
final int N = mActivityMonitors.size();
for (int i=0; i<N; i++) {
final ActivityMonitor am = mActivityMonitors.get(i);
if (am.match(who, null, intent)) {
am.mHits++;
if (am.isBlocking()) {
return requestCode >= 0 ? am.getResult() : null;
}
break;
}
}
}
}
try {
intent.migrateExtraStreamToClipData();
intent.prepareToLeaveProcess(who);
//这里是打开activity的地方,核心功能在whoThread中完成
int result = ActivityManagerNative.getDefault()
.startActivity(whoThread, who.getBasePackageName(), intent,
intent.resolveTypeIfNeeded(who.getContentResolver()),
token, target != null ? target.mEmbeddedID : null,
requestCode, 0, null, options);
//专业抛异常的
checkStartActivityResult(result, intent);
} catch (RemoteException e) {
throw new RuntimeException("Failure from system", e);
}
return null;
}

然后切入到ActivityManagerNative.getDefault().startActivity中,它是ActivityManagerProxy类,这里就是在处理一系列的数据。

1
2
3
4
5
6
7
8
9
10
11
12
13
14
15
16
17
18
19
20
21
22
23
24
25
26
27
28
29
30
31
32
33
public int startActivity(IApplicationThread caller, String callingPackage, Intent intent,
String resolvedType, IBinder resultTo, String resultWho, int requestCode,
int startFlags, ProfilerInfo profilerInfo, Bundle options) throws RemoteException {
Parcel data = Parcel.obtain();
Parcel reply = Parcel.obtain();
data.writeInterfaceToken(IActivityManager.descriptor);
data.writeStrongBinder(caller != null ? caller.asBinder() : null);
data.writeString(callingPackage);
intent.writeToParcel(data, 0);
data.writeString(resolvedType);
data.writeStrongBinder(resultTo);
data.writeString(resultWho);
data.writeInt(requestCode);
data.writeInt(startFlags);
if (profilerInfo != null) {
data.writeInt(1);
profilerInfo.writeToParcel(data, Parcelable.PARCELABLE_WRITE_RETURN_VALUE);
} else {
data.writeInt(0);
}
if (options != null) {
data.writeInt(1);
options.writeToParcel(data, 0);
} else {
data.writeInt(0);
}
mRemote.transact(START_ACTIVITY_TRANSACTION, data, reply, 0);
reply.readException();
int result = reply.readInt();
reply.recycle();
data.recycle();
return result;
}

所以我们得看ActivityManagerNative.getDefault(),这里用了一个单例返回IActivityManager对象,并调用了asInterface来获取。关键就是mRemote发送了一个START_ACTIVITY_TRANSACTION消息给ActivityManagerNative。

1
2
3
4
5
6
7
8
9
10
11
12
13
14
15
16
17
18
19
   /**
* Retrieve the system's default/global activity manager.
*/
static public IActivityManager getDefault() {
return gDefault.get();
}
private static final Singleton<IActivityManager> gDefault = new Singleton<IActivityManager>() {
protected IActivityManager create() {
IBinder b = ServiceManager.getService("activity");
if (false) {
Log.v("ActivityManager", "default service binder = " + b);
}
IActivityManager am = asInterface(b);
if (false) {
Log.v("ActivityManager", "default service = " + am);
}
return am;
}
};

这里就开始涉及Binder机制,大致就是ActivityManagerProxy作为客户端调用了startActivity方法,而具体的实现是在服务端(进行了startActivity调用),对应的类为ActivityManagerService(同样继承自ActivityManagerNative)。接下来先看ActivityManagerNative。

1
2
3
4
5
6
7
8
9
10
11
12
13
14
15
16
17
18
19
20
21
22
23
24
25
26
27
28
29
30
31
32
public boolean onTransact(int code, Parcel data, Parcel reply, int flags)
throws RemoteException {
switch (code) {
case START_ACTIVITY_TRANSACTION:
{
data.enforceInterface(IActivityManager.descriptor);
IBinder b = data.readStrongBinder();
IApplicationThread app = ApplicationThreadNative.asInterface(b);
Intent intent = Intent.CREATOR.createFromParcel(data);
String resolvedType = data.readString();
Uri[] grantedUriPermissions = data.createTypedArray(Uri.CREATOR);
int grantedMode = data.readInt();
IBinder resultTo = data.readStrongBinder();
String resultWho = data.readString();
int requestCode = data.readInt();
boolean onlyIfNeeded = data.readInt() != 0;
boolean debug = data.readInt() != 0;
String profileFile = data.readString();
ParcelFileDescriptor profileFd = data.readInt() != 0
? data.readFileDescriptor() : null;
boolean autoStopProfiler = data.readInt() != 0;
//调用AMS的startActivity
int result = startActivity(app, intent, resolvedType,
grantedUriPermissions, grantedMode, resultTo, resultWho,
requestCode, onlyIfNeeded, debug, profileFile, profileFd, autoStopProfiler);
reply.writeNoException();
reply.writeInt(result);
return true;
}
//省略...
}
}

之后就开始调用AMS中的startActivity了,服务端的startActivity从这里开始。

1
2
3
4
5
6
7
8
@Override
public final int startActivity(IApplicationThread caller, String callingPackage,
Intent intent, String resolvedType, IBinder resultTo, String resultWho, int requestCode,
int startFlags, ProfilerInfo profilerInfo, Bundle bOptions) {
return startActivityAsUser(caller, callingPackage, intent, resolvedType, resultTo,
resultWho, requestCode, startFlags, profilerInfo, bOptions,
UserHandle.getCallingUserId());
}

整个客户端时序图如下:
启动流程第一部分

结束语

startActivity第一部分就到这里,从Binder机制来理解,这就是客户端部分,后面会深入到服务端部分。要注意这里是基于Android7.1.1的源码来分析,因为我发现Android4.0.3的代码中AMS中的startActivity就有一定的区别。